Software engineering
Note: This chapter does not contain any practical material. Working through the tasks needed to make software is most rewarding with your own code, problem and potential users – it's a bit dry to practice all of this with contrived examples. Instead, here I give mostly subjective reflections and lessons I have learned about making academic software. I hope this is a useful discussion for both novices and researchers who already have developed many software packages.
Our definition, for research code, of software is that it is designed to be used by other people. Intention and thought has specifically been put into its use and reuse, usually both for end-users applying your method to new datasets, or for other developers who may wish to extend or maintain your code.
We will first discuss why you would want to do this at all, pitfalls and lessons in software engineering, and a summary of my top tips for doing this as part of your research career.
The module then lists the steps required to make your methods into software and some tools to help you achieve them.
Contents:
- Why bother?
- Lessons learned from my experiences
- Top tips
- Making a package – necessary steps
- Making a package – strongly recommended steps
- Making a package – good practice
Why bother?
It takes some time to make a piece of software, and even longer to support and maintain it. So why go through this?
The first advantages are practical. Having worked hard on your method, it's often only a small amount of extra initial work to make something that's more like a piece of software. Using this you can get a better and faster workflow, achieve better reproducibility, and increase the quality of your own results.
Once your software starts to get used by others, you'll see some advantages beyond your own work. It's a great basis for help people with less expertise in the field than you, and potentially starting collaborations. It increases the impact of your work, and makes the time you spent on the method more worthwhile.
Finally, for established software this can have a very positive impact on your own career. You can become quite famous (famous for a scientist anyway) through well-used and well-liked software.
Drawbacks
It's not all roses:
- It's hard to get funding for software development.
- It is not always a well-respected research activity, especially at early career stages.
- User issues can be frustrating.
- Software maintenance can last a lot longer than you originally planned.
For me, all of the above outweigh this – particularly the joy in helping others and the improved workflows in my own research.
So do consider if it's worth it for you overall, and whether it's worth it for the specific method or piece of code you are writing. Not everything should be a software package!
Lessons learned from my experiences
Here is a highly subjective list of lessons I think I have learnt along my way:
The basics:
- Make installation as easy as possible.
- The next most important thing after installation is documentation.
- Include tutorials with real data in the documentation.
- Actively seek feedback on your documentation.
- License your software.
- A good name (at least possible to say out loud) and logo are worth thinking about. Consider your audience a bit here. Bioinformaticians, yes a silly backronym or LOTR reference will go down well. Clinicians or public health? Maybe something more sensible.
- Choose the right language for the job (or multiple languages). Your favourite, good package or community support, learning something new are all good reasons to go for something. R is not better than python and python is not better than R.
- Add some testing, but not necessarily unit testing.
Maintaining software:
- Write down ideas or possible bugs as issues, with enough information to understand them in a year's time.
- When working with others use an organisation repo not your own one to get better control over access.
- Split your packages up into smaller pieces/sub-packages.
- Start to think about life-cycle. Retire old packages which are no longer worth your time to maintain. By this I mean freeze the code and do not make further changes or fixes.
- Write (and supervise writing of) maintainable code. Good luck with this one. Use an organisation repository
- Avoid dependencies if easy to do so.
- With later-stage software, prioritise fixing bugs over adding features.
- For bigger packages, unit tests are worthwhile.
Community interactions:
- Not everyone needs to use your approach. You might be convinced you have the best software, but people's needs are different and you can't make something that equally satisfies everyone.
- Users can be callous! They are interested in finding a method/software tool which is best for their needs. Don't expect if you sink a lot of time into helping someone that it will definitely be useful for their needs.
- Redirect email queries to github. Then everyone can see them and their solution, and other people can help answer them.
- Don’t solve every problem, it’s ok to say no. Think about how many people would benefit from a change.
- It’s ok to disagree with others on style (including this guide), be pragmatic and even if you feel inexperience in software engineering your opinion matters.
Top tips
- Make installation easy (should typically take around a day). This is the first hurdle. Not installable, not reusable.
- Make a sensible interface and defaults (typically around half a day). Think about what users typically want, and make it easy for them to get going.
- Make good documentation (at least 1-2 days). You will save yourself and others so much time by investing effort in making good documentation.
As with other sections of this course, I would advise to think about where to spend your time on software development. It's easy to fall into a hole of adding features, optimising code, perfecting the packaged, even if it might not be that useful. Be intentional with where you spend your time in software.
In my experience activities can roughly be split as follows:
High impact: installation, documentation, solving your own research questions.
Medium impact: basic tests, making it look good, interface design, speeding up frequently used code.
Low impact: issues affecting a single person, speeding up rarely used code, adding features
It’s also ok to do things that you enjoy – not every decision needs to be based on impact. Although I've spent most of this course saying the opposite, sometimes adding a feature or doing a better reimplementation can be very satisfying.
Making a package – necessary steps
Software engineering is a career in its own right and we can't hope to cover all that's involved here. But here's an attempt at the basic steps you need to take your research code, probably a script, into something that's usable by others.
For all of these steps it's much easier to follow an examples from elsewhere. Once you've done it for yourself, you'll find that it's common to reuse the same patterns and techniques for new packages.
First of all:
- Pick a good name that's not too long or that's impossible to actually say, and isn't already taken by another package in your field. In genomics, do not make packages with a permutations of the letters 'ACGT'.
- Put your code on github or gitlab, if it's not already there.
Structuring code as a package
Most languages have three basic elements needed on top of a script to make something distributable:
- A file with some metadata about the package, often version, dependencies, authors. In python
setup.py, in RDESCRIPTION, and in rustCargo.toml. - Put code into functions in a subfolder (python
package/__main__.py, rustsrc/main.rsorsrc/lib.rs). - Define the
main()function or entry points/exported functions. Make the main function point towards an interface which runs your existing functions.
A single file is hard to navigate, so it's usually a good idea to split your code over files with a common purpose. Functions can be shared across the package. Ideally functions should be relatively short so they can be tested as standalone units (given some input, does the function produce the expected output).
In python making a package structure means you have to install the package before running it, so you may find it convenient to have a 'runner' file in the top directory:
from mypackagename.__main__ import main

if __name__ == '__main__':
    main()
Make a sensible interface
Here by interface I mean a command line interface (CLI). Of course graphical interfaces or websites which run your code are possible and preferred by many users, but these are much more work and are beyond the current scope of this guide.
Running the program with the -h option should show information about the different
options and their defaults. Running with -v/--version/-V should give the version.
Writing code to parse argv (the actual text given on STDIN by the user) is very
tedious and you should use a package to do it for you:
- Python: argparse or docopt packages.
- R: roxygen2 and docstrings above exported function.
- Rust: clap package.
- C++ you can use Boost.Program_options, but a header-only library such as popl will be easier to support.
Try and make your commands simple (i.e. short), and run and work well with the chosen defaults for most users. Be cautious about adding too much or too little flexibility. The former makes getting started with the interface harder, the latter means that the code won't work for as many cases. If possible, getting user feedback can help guide you.
Although a good CLI will be somewhat self-documenting, giving examples, and putting these in the README or main documentation is a good idea. Make sure they run by running them yourself. What about when your code changes, will you remember to check they still run? We'll talk about this in tests and continuous integration below.
If you have a more complex package that performs multiple tasks, consider making subcommands
for each of these. A classic example is git, which has subcommands such as git merge, git commit, git push etc, each
with their own help. docopt and clap have good support for this.
Here's an example from one of my packages which uses clap. Running the program
gives an overview of all its different functions.
Split k-mer analysis

Usage: ska [OPTIONS] <COMMAND>

Commands:
  build     Create a split-kmer file from input sequences
  align     Write an unordered alignment
  map       Write an ordered alignment using a reference sequence
  distance  Calculate SNP distances and k-mer mismatches
  merge     Combine multiple split k-mer files
  delete    Remove samples from a split k-mer file
  weed      Remove k-mers from a split k-mer file
  nk        Get the number of k-mers in a split k-mer file, and other information
  cov       Estimate a coverage cutoff using a k-mer count profile (FASTQ only)
  help      Print this message or the help of the given subcommand(s)

Options:
  -v, --verbose  Show progress messages
  -h, --help     Print help
  -V, --version  Print version
Running a subcommand with -h gives more details:
Create a split-kmer file from input sequences

Usage: ska build [OPTIONS] -o <OUTPUT> <SEQ_FILES|-f <FILE_LIST>>

Arguments:
  [SEQ_FILES]...  List of input FASTA files

Options:
  -f <FILE_LIST>                   File listing input files (tab separated name, sequences)
  -o <OUTPUT>                      Output prefix
  -k <K>                           K-mer size [default: 17]
      --single-strand              Ignore reverse complement (all contigs are oriented along same strand)
      --min-count <MIN_COUNT>      Minimum k-mer count (with reads) [default: 5]
      --min-qual <MIN_QUAL>        Minimum k-mer quality (with reads) [default: 20]
      --qual-filter <QUAL_FILTER>  Quality filtering criteria (with reads) [default: strict] [possible values: no-filter, middle, strict]
      --threads <THREADS>          Number of CPU threads [default: 1]
  -v, --verbose                    Show progress messages
  -h, --help                       Print help (see more with '--help')
  -V, --version                    Print version
Add a README
Github will very insistent that you add a README. There seem to be two main types. Both start with a title and basic description of what the package does.
The first type, and probably what you should start off with, is to document installation and usage, adding all of your documentation to it as you go. Here's an example:
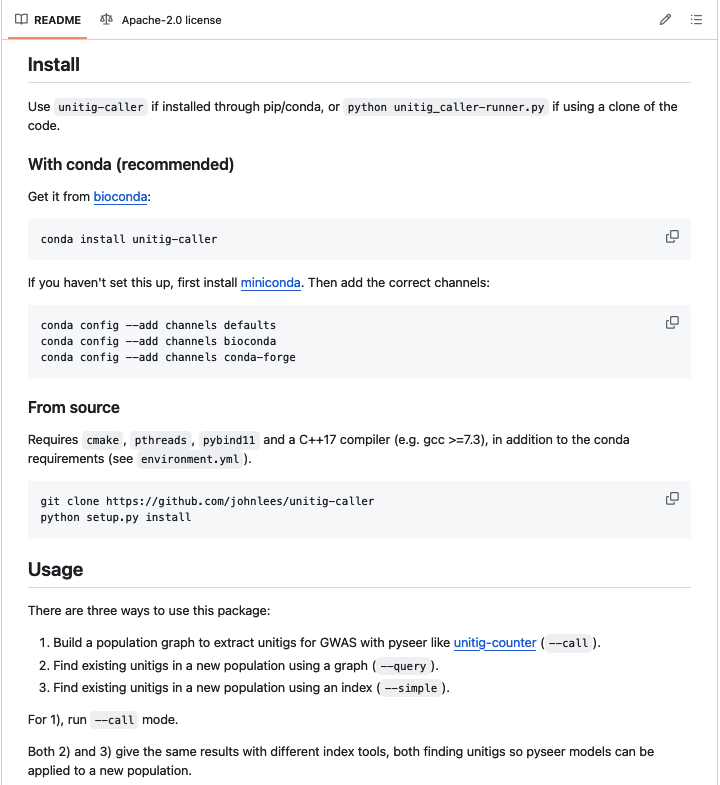
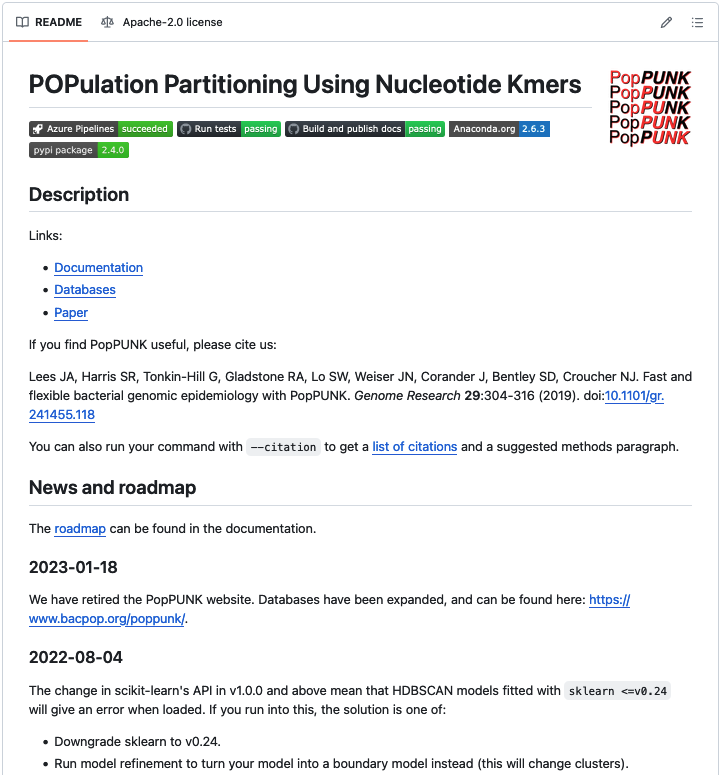
As the resources around the package increase, the README often just points to other resources in a structured manner, and offers some reassuring badges that suggest lots of testing is being run. Here's an example:
Pick and add a license
You'll also want to add a LICENSE file to tell others how your code can and can't be
used and reused. Sometimes you'll also want a separate NOTICE file which has your
name – some licenses end with a section to be modified which goes in this file,
see this example:
There are three basic types of license:
- Copyleft e.g. GPLv3, APGLv3. These mandate that if your code is reused the package which reuses it must use the same license, which precludes its use in most commercial/closed source settings.
- Permissive e.g. Apache-2.0, BSD-3, MIT or the Unlicense. Your code can be reused for any purpose, as long as you are given credit (the Unlicense waives this too).
- Copyright. Others cannot reuse your code without your explicit permission (and possibly payment). This is the default without a license, or if you want to retain rights by licensing through your organisation.
Note, a license is different from being open or closed source (which is not shared publicly at all). Typically the differences in licenses focus on reusing the code you have developed in other projects. Licenses also state that you have no liability and make no promises if the code doesn't work.
Check your organisation's advice or see https://choosealicense.com. In my opinion using a permissive license is usually best.
Tag a release
It's very useful in papers and for reproducibility for users (including yourself) to be able to state which version of the code they used. Once you start getting issues knowing the version used is invaluable.
On git, tags are a convenient name for a specific commit. Like commits, they can be made on your clone and pushed to the remote (i.e. github).
You'll want to use semantic versioning: v1.0.0 (MAJOR.MINOR.PATCH):
- MAJOR version when you make incompatible API changes i.e. old commands, files etc stop working with this version.
- MINOR version when you add functionality, but in a backward compatible manner.
- PATCH version when you make backward compatible bug fixes
Start with v0.1.0 and increment from there. Before v1.0.0 you make no promises that there won't be breaking changes, so usually wait until you're sure everything has settled down before releasing it! (often many years).
Releases can be made on github on the sidebar, adding notes about what has changed
and potentially executables. It will ask for a 'release name' for which mypackagename v0.1.0
is a good choice. If you haven't made a tag, this can automatically create one for you.
Making a package – strongly recommended steps
These two steps are not strictly necessary to make a software package, but I cannot emphasise enough how much of a difference they will make to its success as software. You should consider both as necessary, and that your return on investment in them will be very good (a stitch in time saves nine).
Add documentation
You really must tell people how to use the package, and what to expect when using it. I'm sure we've all been frustrating trying to use undocumented or poorly documented code.
Firstly, note that it’s for you as much as anyone else! I am likely the biggest user of my packages, and constantly use the documentation as a reference. Spending a couple of days, or even longer, writing everything down while it's fresh will save you time later. It will save even more time when you don't have to answer the same requests repeatedly.
Writing documentation is a bit of an art, and actively seeking feedback from users about what they like, what they find confusing and what they would like to see added. Unfortunately you won't hear from most people that tried your package and it didn't quite work for them.
A good starting place is the divio system:
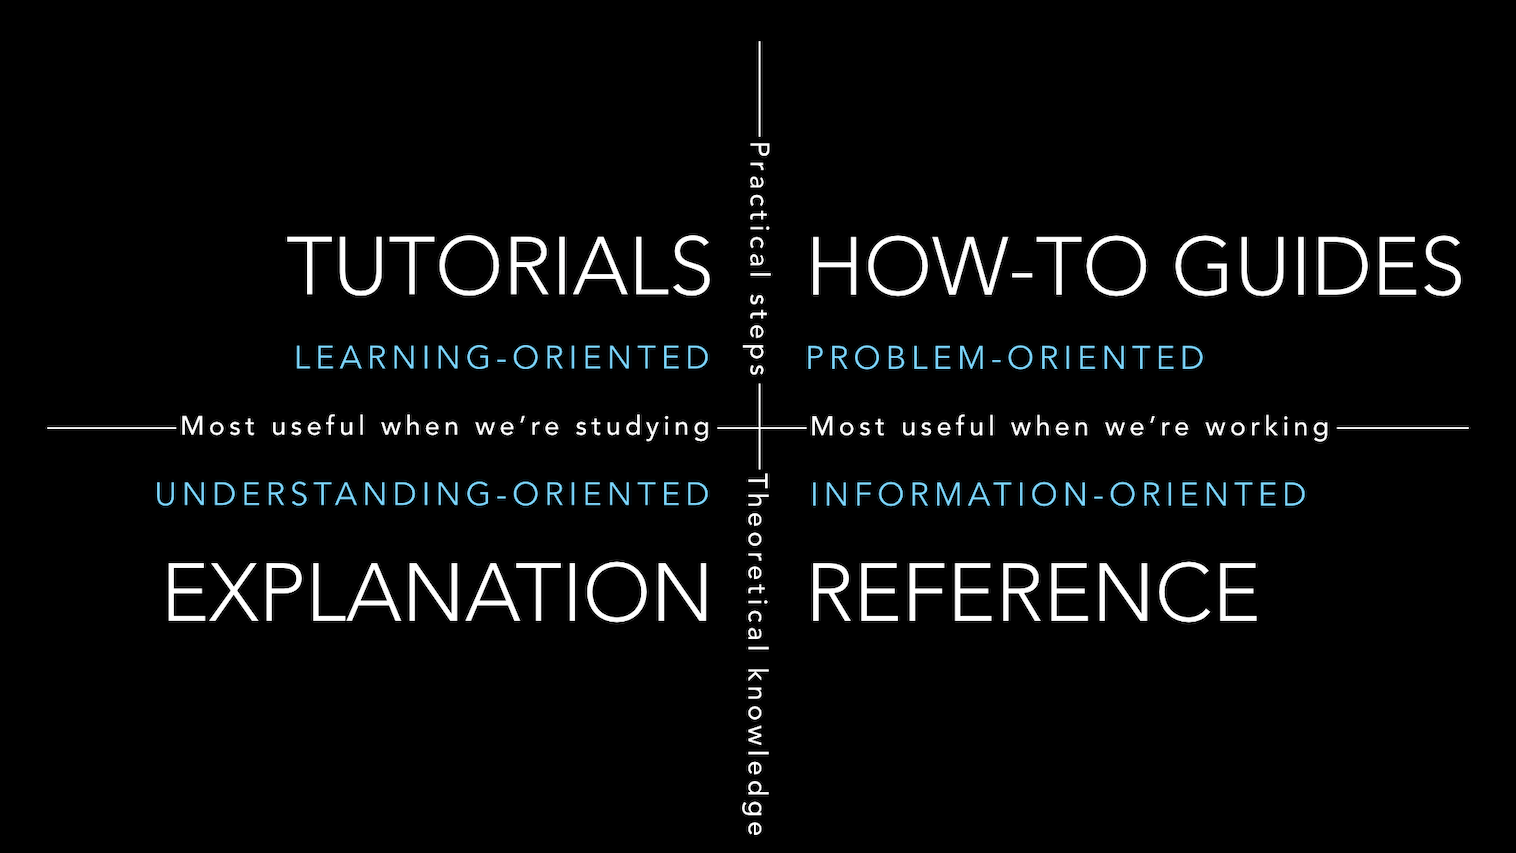
This defines four types of documentation:
- How-to guides, which is usually your usage.
- Tutorials, which show a full worked example with some real or simplified data.
- Explanation, which in research code is most often taken from or expanding what's in the paper.
- Reference. API documentation in e.g. docstrings that explain individual functions. This is mostly for yourself, or others that might contribute to the code.
Don't forget to include commands, images and plots to make it more readable!
To actually make the documentation, it's a good idea just to include it as part of the code rather than making a separate document or website. It will then build every time you make the code and hopefully stay up to date. Just like in your README you can use Markdown to do most of your formatting in text, rather than needing to develop stylesheets. You can use:
sphinxin python. The default is to use reStructuredText rather than Markdown which has slightly more features, but you can change this.roxygen2in R.cargo docin rust.
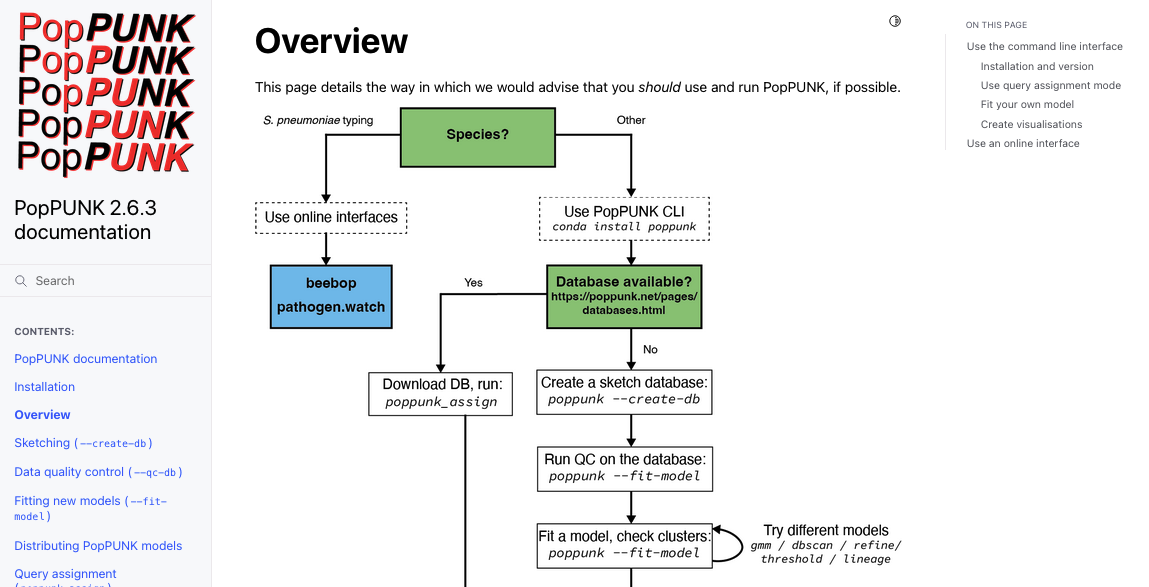
Here is an example using sphinx:
An example in R using roxygen:
Here is an example using rust:
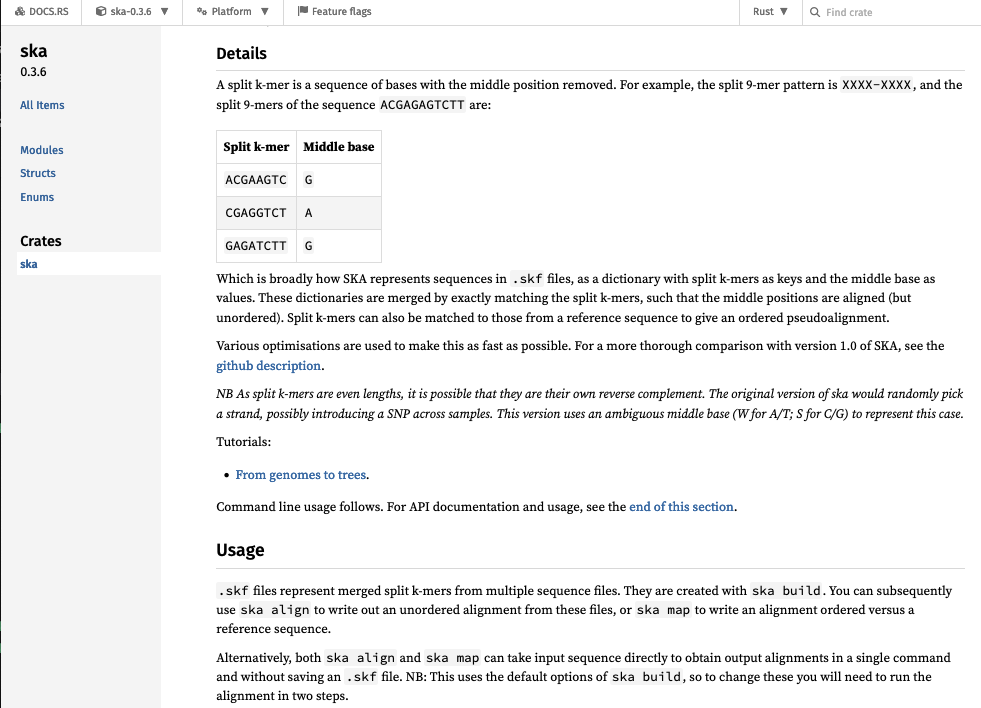
For all of these, you can see the code that generated the docs on github.
Good documentation
- Shows common failure modes and how to fix them.
- Shows figures and plots that are output, or which you have made externally.
- Gives examples of commands which can be run.
- Contains tutorials/vignettes which run through an analysis from end-to-end.
- Stays up to date and will run on the current version of the code.
Bad documentation
The worst type of documentation is documentation that doesn't exist. But these things can be a bit frustrating too:
- Some main function or options are completely undocumented.
- Gives error messages with no detail (e.g. ‘parsing failed’).
- Has out of date/unrunnable options.
Hosting your docs
Once you've built documentation by running one of the above options on your code, you can use the following free services:
- readthedocs.org (though this is becoming increasingly fiddly).
- github.io. Just make a branch that points to the html files.
- netlify supports many builders which integrate with github. You will however want a custom domain so you don't get a nonsense URL, which you will need to pay for (a tiny research cost honestly).
- Azure static websites similar to netlify, but currently still free for private organisation repos.
In rust, documentation will magically appear on https://docs.rs/ when you upload a crate.
Add installation methods
You should have at least one way to install your software, but having two different methods is a good starting aim as it's not uncommon for people to be unable to use one of them. Having more options isn't a bad idea, but probably has diminishing returns.
The fundamentals for each language are:
- For python you need to write a
setup.pyfile which you can then use withpip installto install your package. A more modern solution ispoetry. - For R using RStudio's 'New project' will get you started, then
devtools::install(). - For rust, just run
cargo install.
Assume that people do not have admin rights, so using sudo or similar is not going to work.
To depend or not to depend
Usually installing your software isn't too hard (especially if its an interpreted language), but any dependencies you've used are what starts to make things tricky. You shouldn't typically expect users to be able to install dependencies themselves, so using some form of package manager with dependency management is a must.
Here's a depressingly common scenario:
- Your package depends on
scikit-learnand works nicely with the current release. - Down the line the API changes and your function suddenly stops working with the current version, or worse has been removed entirely.
- At this point your software breaks.
- Unable or unwilling to fix this problem you didn't cause, you pin the version of
scikit-learnto be lower than or exactly the one which works. - Your other dependencies update to the new API.
- The package manager can no longer find a set of versions which satisfy the constraints.
So without maintenance everything stops working over time 😪.
You could just do everything from scratch and avoid dependencies entirely. In some areas, such as fundamental sequence analysis, this is a possibility. But using dependencies not only makes things quicker to develop, they are usually well-tested and more reliable and optimised than your own version could realistically be.
My advice is to take a pragmatic approach to each dependency. Could it easily be avoided? Then add it in yourself. Otherwise bite the bullet. Be slightly more avoidant of complex packages which require code to be compiled or use many languages (e.g. PyTorch) -- would a simpler solution avoid them? Sometimes that's a compromise you need to make with software, where 'it works for me' isn't good enough.
Also accept that pretty much everything needs at least some love and time to keep going. Is it worth it? Has it been superseded? At some point sunsetting your package and withdrawing active support can become the right option.
If this worries you:
- Make a docker container, see below (although this isn't entirely foolproof)
- Consider engaging with the software sustainability institute.
Official package repositories
Package repositories have the great advantage that they are very easy for users to work with as they have official support:
- Python – PyPI, submit with
twine upload. - R – CRAN or Bioconductor, submit with
devtools::release(). - Rust – https://crates.io, submit with
cargo publish.
Caveats:
- PyPI – dependencies don’t work properly in pip. You really can put anything on there.
- CRAN – difficult to pass all the checks.
All languages
The following methods should work for all languages and are a good addition to the official route:
- bioconda or conda-forge – user runs
conda install <package>which gives them a pre-built binary. compatible with their installed dependencies. Installs into an environment. - https://easybuild.io/ runs the build locally, which can give more efficient
- Docker and/or singularity – creates a snapshot of the whole environment which the user then pulls.
conda does resolve dependencies properly, but its use can cause difficulties for novices, especially with multiple environments. Creating recipes for your packages is quite easy, especially for python packages. Follow an example.
Docker/singularity are more effort to make and use, but have a (mostly) guaranteed environment and are a good backup when conda won't work. Note that docker typically requires admin rights to run, so having both is a good idea (use the converter). Make sure you give example commands of how to use the container, most users will not know what to do with a docker image.
Installing from source is good to include for your own reference, but not a route that most non-developer users will be able to follow, especially when dependencies are involved.
Making a package – good practice
Software engineers will probably do all of the following, but they are less critical (and more time-consuming) than the above points. Once you're used to them they can easily become part of every project, but starting out doing at least the basics here will help improve your code.
Add some tests
As researchers, we are typically pretty good at questioning results from code and usually come up with ways of diagnosing whether our output looks correct. Usually this means plotting the data.
In software engineering testing is a lot more formalised, usually by giving the program some input data and then mandating that it gives exactly the expected output. They are very useful with complex code for ensuring that when you change some code, it doesn't break anything elsewhere (known as a regression). Adding tests when you write new functionality also ensures that it actually works (and perhaps considers all the difficult edge cases).
There are three types of test that might be useful to add:
- Smoke tests which simply check you can install and run the package.
- Integration tests, which test a full command's workflow i.e. executing the whole program.
- Unit tests, which test the behaviour of a single function (unit).
Here is a smoke test in rust which tests the program can be run and it makes the output file:
#[test]
fn build_cli() {
    Command::new(cargo_bin("ska"))
        .current_dir(sandbox.get_wd())
        .arg("build")
        .arg("-f")
        .arg(rfile_name)
        .arg("-o")
        .arg("basic_build_opts")
        .args(&["-v", "--threads", "2", "-k", "31"])
        .assert()
        .success();

    assert_eq!(true, sandbox.file_exists("basic_build_opts.skf"));
}
Here is an integration test from the same file, which also tests the output is as expected:
#[test]
fn build_and_align() {
    let sandbox = TestSetup::setup();

    Command::new(cargo_bin("ska"))
        .current_dir(sandbox.get_wd())
        .arg("build")
        .arg("-o")
        .arg("basic_build")
        .arg("-k")
        .arg("15")
        .arg(sandbox.file_string("test_1.fa", TestDir::Input))
        .arg(sandbox.file_string("test_2.fa", TestDir::Input))
        .assert()
        .success();

    let fasta_align_out = Command::new(cargo_bin("ska"))
        .current_dir(sandbox.get_wd())
        .arg("align")
        .arg("basic_build.skf")
        .arg("-v")
        .output()
        .unwrap()
        .stdout;

    let correct_aln = HashSet::from([vec!['A', 'T'], vec!['C', 'T']]);
    assert_eq!(var_hash(&fasta_align_out), correct_aln);
}
Here is a unit test which tests a single function and the ways it can go wrong (the function and test are in the same file):
/// Adds a split k-mer which is a self-rc to the dict
/// This requires amibguity of middle_base + rc(middle_base) to be added
fn add_palindrome_to_dict(&mut self, kmer: IntT, base: u8) {
    self.split_kmers
        .entry(kmer)
        .and_modify(|b| {
            *b = match b {
                b'W' => {
                    if base == 0 || base == 2 {
                        b'W'
                    } else {
                        b'N'
                    }
                }
                b'S' => {
                    if base == 0 || base == 2 {
                        b'N'
                    } else {
                        b'S'
                    }
                }
                b'N' => b'N',
                _ => panic!("Palindrome middle base not W/S: {}", *b as char),
            }
        })
        .or_insert(match base {
            0 | 2 => b'W', // A or T
            1 | 3 => b'S', // C or G
            _ => panic!("Base encoding error: {}", base as char),
        });
}

#[cfg(test)]
mod tests {
    use super::*;

    #[test]
    fn test_add_palindrome_to_dict() {
        // Initialize the test object
        let mut test_obj = SkaDict::<u64>::default();

        // Test case 1: Updating existing entry
        test_obj.split_kmers.insert(123, b'W');
        test_obj.add_palindrome_to_dict(123, 1);
        assert_eq!(test_obj.split_kmers[&123], b'N');

        // Test case 2: Adding new entry with base 0
        test_obj.split_kmers.clear();
        test_obj.add_palindrome_to_dict(456, 0);
        assert_eq!(test_obj.split_kmers[&456], b'W');

        // Test case 3: Adding new entry with base 3
        test_obj.split_kmers.clear();
        test_obj.add_palindrome_to_dict(789, 3);
        assert_eq!(test_obj.split_kmers[&789], b'S');

        // Test case 4: Updating existing twice
        test_obj.split_kmers.insert(123, b'W');
        test_obj.add_palindrome_to_dict(123, 1);
        test_obj.add_palindrome_to_dict(123, 1);
        assert_eq!(test_obj.split_kmers[&123], b'N');
    }

    #[test]
    #[should_panic]
    fn test_panic_add_palindrome_to_dict() {
        // Test case 4: Panicking with invalid base
        let mut test_obj_panic = SkaDict::<u64>::default();
        test_obj_panic.add_palindrome_to_dict(987, 5);
    }

    #[test]
    #[should_panic]
    fn test_panic2_add_palindrome_to_dict() {
        // Test case 5: Panicking with invalid middle base
        let mut test_obj_panic = SkaDict::<u64>::default();
        test_obj_panic.split_kmers.clear();
        test_obj_panic.split_kmers.insert(555, b'A');
        test_obj_panic.add_palindrome_to_dict(555, 1);
    }
}
Integration tests are usually quite easy to write. However, with more complex code, if they fail you won't get information on what has failed and why. Many software engineers prefer to write unit tests to ensure errors are more precise, and furthermore believe that this writing code with testability in mind improves your coding practices.
Personally I would suggest a more relaxed approach to testing in research software, especially in your first forays into this area. Adding a smoke test and a couple of integration tests is a good way to get started.
As always, consider how much time it will take and whether you will benefit from it. More tests can also increase the burden on new contributors, so make sure they are checking functionality over style.
If you are writing unit tests I've found ChatGPT is good at writing them if you paste the function to be tested in. Note the style of unit testing requires that your code be written in testable units i.e. you need to write short functions with defined input and output, not giant functions with many different possible paths through them.
If you really want to go further in this direction you can also check your test coverage with codecov. This checks which lines of your code are actually being run when tested, to make sure that every possible path through the code has been checked. This is rarely necessary with research code, but if you add it and then make a small pull request with a new function, it can be useful to check you have actually tested your change.
Automate your tests using continuous integration (Github actions)
Much like documentation, tests are best when they are integrated as part of your code.
R and rust both have integrated tools to run the tests (devtools::check() and cargo test respectively),
for python you will probably want to use a package such as pytest and/or you can
write a wrapper script to run your tests.
It's hard to remember to do this with every change, and also make sure other contributors are checking the tests. Using continuous integration (CI), where an external server (usually virtual machine) automatically tries to install, run and test your code solves this.
Github actions will let you run code when you commit, create pull requests etc. Common examples are:
- Check tests pass (CI)
- Run a linter (see below)
- Make and upload a release (continuous deployment)
- Build the documentation
They are useful for anything you might forget to do! To set them up, you just
need to add YAML files in .github/workflows/. Check
out some examples to get started, and note that you can run almost any command you want.
People also like to put badges for their tests in the README, which I am sure you have
seen before:
![]()

![]()
![]()


Code quality
When we discussed this in the first iteration a question at the end was 'how can I keep getting better at coding?'. Two vague suggestions:
- Work with people (software engineers, research colleagues) who are have more experience than you, or your peers.
- Keep being interested in learning new patterns, check what recommended solutions in a language are.
Two concrete suggestions I will expand upon are code linting and code review.
Linting
Linters are programs which checks you code formatting and standard:
R CMD check- Python –
black - Rust –
cargo clippyandcargo fmt
These can give you really useful suggestions such as using a neater function, finding an unused or undefined variable. I prefer ones which will make sensible changes for you (better if you have tests to check everything still works). They can also be annoying! You certainly don’t have to follow it, and please don't get hung up on fixing every 'failure':
- CamelCase vs underscore_names
- Number of function args
- Spaces around arguments
- ‘complexity’
Implement code review
This is perhaps the best way to get better at coding. Asking someone to review all of your code in a package isn't viable, but updates, and small pieces of code are doable.
Here is a good workflow for making this work. Firstly, make contributions are small, clean, and usually to close a single issue. Then:
- Write your code on a branch
- Commit regularly
- Make sure tests are passing
- When ready, open a pull request
- Suggest a reviewer
- Reviewer comments, requests changes
- Make changes, make sure tests are passing
- Request re-review
- Reviewer merges PR into master/main branch
Who should review? You can ask other students, colleagues or your supervisor (if they are capable!). Anyone you would happily review for. It doesn't matter if they are more/less experienced than you.
How to review? Not like a paper! Make necessary changes, and add any helpful suggestions. Don't be pedantic. No comments are also fine, a lot of code is already good at the stage of a pull request.